
I was out harvesting the seed heads from my garlic chives and noticed the golden raspberries are still producing a few tasty treats. I quickly ate most of them before I remembered to take a photo. These may be the last two golden raspberries of 2014.
Sunday, October 26, 2014
Tuesday, September 30, 2014
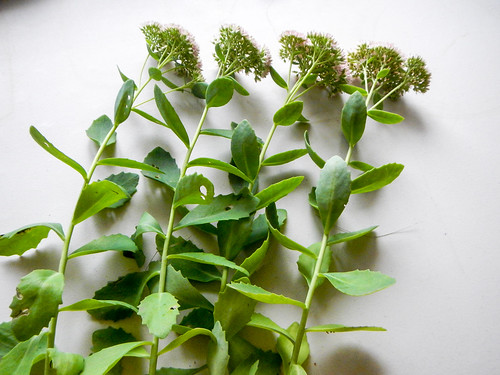
Easy Propagation of Sedum Perennials

My Autumn Fire sedums bloom a gorgeous rosy-pink in late summer, and I wanted more of them. The bees love them, and so do I. The original plant was about $10. I was tempted to visit the garden store to buy more, but decided to do a little research first.
Thanks to Teresa’s blog, I learned how to propagate sedum perennials. You can read her original post here. She describes four different ways of propagation: water immersion, controlled pot growth, direct placement, and division. I am going to experiment with water immersion and controlled pot growth.
Step one for both methods is to get a couple cuttings. I picked some younger shoots on the edge that were about 12 inches tall. I cut the flowers off and saved them in a bowl of water. As my test, I am going to try four starts for each method to see which works best for me.
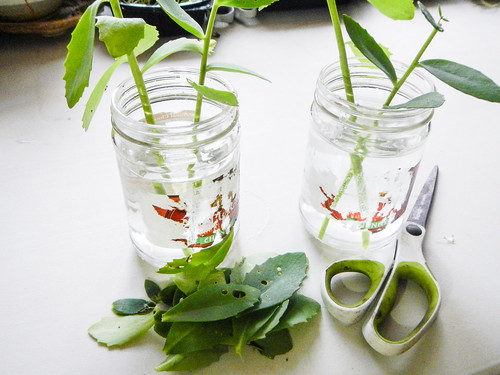
For the water immersion method:
- I cut the initial 12 inch stems into two six inch stems.
- Cut the leaves from the bottom of the stem, so no leaves would be touching the water.
- Put the stems in water and in a sunny window.
- Water until roots form.
For the controlled pot growth method:
- I cut the initial 12 inch stems into two six inch stems.
- Cut the leaves from the bottom of the stems, so no leaves would be touching the dirt.
- Put the stems in some damp potting soil in a sunny window.
- Water until roots form.
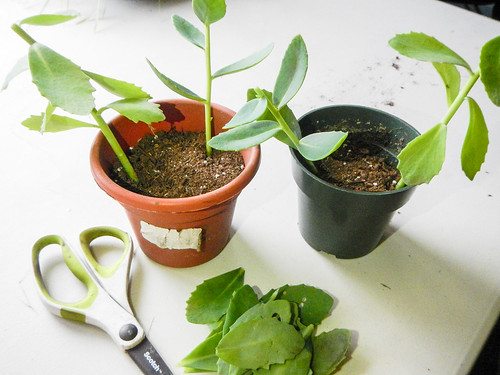
I expect both methods will root in one to three weeks. Stay tuned for future updates!
Friday, September 26, 2014
Small Toad

When planting earlier this month, I found several small toads jumping across the yard. I moved them out of the way so they wouldn’t get squished. I usually have a few toads in the yard, but this is the most I have seen in one day (four). It is a great sign there is enough diversity in my yard for them to thrive.
Tuesday, September 23, 2014
Planting Chokeberry Bushes

Last year I planted six cherry bushes. Only two of them survived the winter, so I bought some chokeberry bushes to add some variety to the future hedge. I planted two different kinds. One of them came with 1/2 pound of berries which I am going to turn into a syrup. The berries on the Autumn Magic tasted slightly better than the glossy black.

Glossy Black Chokeberry aka Aronia melaocarpa var. elata. Height: 4-6’, Spread: 4-6’, Hardy to –40F. Full Sun
Autumn Magic Chokeberry aka Aronia melanocarpa ‘Autumn Magic’. Height: 4-6’, Spread: 4-6’, Hardy to –40F. Full sun to part shade.
Friday, September 19, 2014
Planting a new Hardy Kiwi

Last year, I planted two Issai Hardy Kiwis. A few months later one was trampled by some contractors my neighbor hired. I was hopeful it would recover. It didn’t. I bought a new one and planted it. It is much more vigorous than the one I planted last year, so I am hopeful it will survive and thrive.
Issai Hardy Kiki aka Actinidia arguta ‘Issai’. Height: 15-25’, Spread: varies (vine), Hardy to –30F.
Tuesday, September 16, 2014
Busy Bumblebees

The bumblebees are busy enjoying the autumn flowers! The top is a bright pink sedum, and the bottom two shots are of the prolific garlic chives in my yard. The bees seem to go crazy for both. The cold had them moving slowly, so I could keep up with them and get a few photos.
Friday, September 12, 2014
Planting Fruit Trees

With help from a friend, I planted two more fruit trees this past week. One plum and one cherry. We gave them a large helping of mulch too. Since we had a bit of mulch left over with my two apple trees in the background got some more as well. I had fun hauling the mulch with my sidecar.
The plum is a “Mount Royal Plum” aka Prunus ‘Mount Royal’. Height 8-12’, Spread: 6-10’, Hardy to –30F.
The cherry is a “North Star Cherry” aka Prunus ‘North Star’. Height: 8-10’, Spread: 6-8’, Hardy to –30F.
Monday, August 25, 2014
Checking on the Honeybees

It has been a few months since I last checked on my honeybees. It was a quiet evening and finally not hot. I put on my bee suit and went back to open up the hive to see how the girls were doing. I've see them flying around often, so I wasn't very worried.

The bees seemed pretty calm, so I didn't bother to fire up the smoker. I don't like using it. I concentrated on staying calm while moving slowly and mindfully. I didn't want to squish any of the bees while I checked things out.

The only tool I used was a bread knife to cut the bridge comb and loosen the bars. Bridge comb is when the bees attach the honeycomb on the bars to the inside of the hive. The bees did a great job making the hive airtight with propolis. The bars were all sealed together and to the hive body.

My first view inside the hive. This comb is almost finished and full of honey.

Further into the hive and lots of capped honey. I hope they are able to make enough to feed themselves through the winter. I don't plan on taking any of their food (honey).

A view of the comb inside the hive. This is the comb on the end and isn't quite finished.

The comb on the end taken out, so you can see it better. It was only partially attached, and much heavier than it looked. The weight is due to all the honey. I was very careful to turn it along the vertical axis to avoid breaking it.
I had a fun time looking at the hive. I added a few bars to give them more space since they had used up everything so far.
I am far from an expert, but they seem to be healthy. I didn't see any obvious signs of disease or pests. I'm very happy the bees seem calm. I might check on them one more time before winter if time allows.
Wednesday, August 6, 2014

Wednesday, July 23, 2014
African Violets Blooming

My african violets are finally blooming again. It has been quite a while since I have been able to enjoy the vibrant purple flowers.
Tuesday, June 17, 2014
Planting Hostas and a Lilac

A friend was thinning out her giant hostas and offered me the change to take one home. I couldn’t resist such a generous offer and rode over in the Ural to collect the hosta. It was almost three foot in diameter. A giant. It just barely fit into a plastic storage bin.

I broke the big hosta into large chunks and planted them around one of my spruce trees. Some of the littler hunks I put with some other perennials on the side of the house. In all, the giant hosta turned into about 20 little hostas. I don’t think a couple of them will survive since they were pretty damaged while breaking the roots apart, but I hope they do. I think they will look great in the yard later.

I also planted a small lilac. I’ve wanted one for a while. I love how they smell and look. This one is supposed to only get five foot tall and round. The honeyberry bushes are in the background.

It was a great day for planting. *fingers crossed* everything will survive.
Lilac ‘Miss Kim’ aka Syringa patula. Height: 3-5’, Spread: 4-5’, Hardy to –40F.
Friday, June 13, 2014
Flowers and the First Ripe Strawberry
I haven’t spent as much time in the garden as I would have liked this spring, but I have been enjoying the flowers blooming. The peonies are looking amazing in front of the house. The flowers are so big, they are making the plants fall over.

The lilies are also looking great!

The strawberries have been blooming for a few weeks now, and I finally spotted the first ripe one before the squirrels. It was delicious. The honey bees must be doing a great job pollinating as this is the most strawberries I have seen on these plants! I can’t wait to eat some more!

Thursday, May 1, 2014
Honeybees!

I’ve been wanting bees since last year. I used to confuse bees, wasps, and hornets, but then I read a few books and became hooked. They are amazing creatures. I tried to get them last year, but I was too slow. I didn’t realize you need to order them in Dec/Jan instead of April. I was ready this time.

I ordered the bees from a local supplier in southern Minnesota at the beginning of the year. The just shipped them this past Monday via USPS. I was excited and scared when the post office called yesterday and left me a voicemail, “Mr. Luhman, your bees are here. Please come pick them up by 6pm.” *gulp*

I rode over after work and picked them up from a post office warehouse. The box was smaller than I expected. I ordered three pounds. It easily fit into my sidecar. I took them home and let them rest in my dinning room for the night. It was very strange to eat dinner with thousands of bees safely buzzing a few feet away. My friend and I liked it.

I didn’t hive them the first night since it was too cold and rainy. The next day promised to be better. It was misty and slightly cold. Too cold for the bees to fly (below 50), and they also don’t fly in the wet.

I put the queen cage in first. I left the stopper and will remove it tomorrow. I wanted to give the bees another day to get used to their queen since they were probably first paired up on Monday when they shipped.

Queen in her cage

Queen cage installed in hive

Once the queen was safely inside, I bonked the box on the ground a few times to loosen the mass of bees.

Then I poured them into the hive in a big lump. It was a strange sight. I’ve seen it many times on youtube, but it was still weird to pour them out.

I put some sugar water into the hive as well. There is still nothing blooming yet since it has been so cold and wet. I will very likely have to replace it tomorrow morning. With the hive buttoned up, and the new cover in place. I went back into the garage. A few bees were stuck on my bee suit. They were cold and wet and couldn’t fly away.

So far, I think it was a successful bee day. I only squished a couple by mistake (newbie mistake) and I didn’t get stung. I’m VERY excited to learn from the bees. I bought them to learn from, pollinate my garden, and try to raise a healthy colony. If I get honey, ok, but it is not the main reason I am interested in them.

If you want to learn more about bees:
1) Watch “More Than Honey” a great documentary. The subtitles on netflix streaming are goofed, so get the disc or watch somewhere else.
2) Read: “The Thinking Beekeeper”
3) Watch: “OutOfABlueSky” or “GoldStarHoneyBees” YouTube
Friday, April 18, 2014
Vermicomposting Basics
A few weeks ago I taught a class on vermicomposting for a local group. This post is a modified version of the handout I created and used during the class.
What is Vermicomposting?
“Vermi” in latin means “worm” and compost is the process of turning organic waste into soil. Vermicomposting is simply making soil with worms. Vermicompost is the end product and is a very nutrient-rich, organic compost full of microbes. It is also known as worm castings or worm poop.
Why do it?
There are many reasons to compost with worms.
- Compost indoors. It’s cold in the winter
- Local, efficient recycling of organic matter.
- Divert food waste and paper products from the landfill. It is estimated that 1/3 of all waste is from food.
What do I need?
Required:
- A bin
- Worms – red wigglers aka Eisenia fetida
- Worm food and bedding
Nice to haves:
- Knife or scissors to cut scraps
- A shredder for cutting bedding material (cardboard and paper
- Small rake/scooper
- Container to collect scraps
Worm Needs
Worms have similar needs to humans. They need oxygen, shelter, food, and water. They need a moist, temperate environment with temperatures between 40 and 80F with the sweet spot 65-70F. They also like it dark. They need good airflow to breathe as they breathe through their skin. I keep my worms in the kitchen year-round for easy access.
What to use for bedding?
Shredded cardboard is great bedding. It is absorbent and it doesn’t mat down when wet like normal office paper. When mixed with cardboard, newspaper and paper work well. Sawdust, hay, and dried leaves can also be used. They cannot eat plastic and glossy paper, so those should be avoided.
What to feed?
Worms will eat most any kitchen scraps, but they seem to like fruit the most. Other good options are veggies, coffee grounds, tea bags, plate scrapings, egg shells, bread, pasta, and peels. Worms don’t like spicy food like onions and garlic, so feed them in small amounts. Large amounts of citrus should also be avoided. Greasy foods including meat, dairy, bones, and fish should be avoided. Make sure to remove sticky labels, rubber bands, plastic, tea bag staples, and other inorganic material before adding scraps to the bin.
Worm Reproduction?
Worms are hermaphrodites, meaning they have both gender’s sex organs. Two adult worms are needed to make fertilized cocoons. An adult worm can lay about 2-3 cocoons per week. The cocoons hatch in 18-28 days and there are between 2-4 worms per cocoon. It will take about 28 days for a worm to reach maturity after hatching.
How to feed?
Smaller scraps will be processed faster than large pieces by the worm bin. Scraps can be torn or cut before being put into the bin. Put small amounts of food and rotate around the bin without feeding in the same place twice. When feeding, add some fresh bedding to help absorb moisture from the scraps and help keep aeration. Feed regularly, but not too often. Feeding too often could create adverse conditions for the worms by generating extra heat or gases harmful to the worms. Feeding two to three times a week is recommended. Worms can eat about half their weight in food each day, so one pound of worms can eat ½ pound of food a day.
How to harvest worm castings?
Castings are ready to harvest when the food scraps and bedding have been fully processed and are not recognizable. This can take between one and six months depending on the strength of the bin. There are several ways to harvest. One simple method is to dump the bin and sort the worms and finished compost by hand. Another way is to shine a bright light on a finished tray. The worms will migrate away from the light since they do not like light. A third way is to add a pile of fruit into a mesh bag. Most of the worms will move into the fruit inside the bag and can be easily removed from the compost.
How to use vermicompost?
Use it like compost from an outdoor bin. It can be dug in lightly to the top soil of a garden or added to the soil of house plants. Vermicompost is fantastic for starting seedlings too.
Some Worm Myths
- It will smell bad! A properly functioning bin smells of fresh soil. It does not stink.
- Worms and bugs will invade and take over! In a properly functioning bin, the worms will not want to leave.
- Too much time! It takes less than 10 minutes a week to feed and maintain a small bin.
- It’s too expensive! It can be as cheap as you want it to be. You only need worms and a bin. Worms are about $20-30/pound and plastic bin can be had for $5.
- Worms are gross! This can be tough to overcome. Worms are part of the natural world. A bin can be maintained without ever touching a worm.
Worm Resources
- My Website: Everyday Urban Gardener http://www.everydayurbangardener.com
- Find places to get worms http://www.findworms.com
- Book: “Worms Eat My Garbage” by Mary Appelhof
- Vermicomposting fanatic http://www.redwormcomposting.com
- Vermicomposting videos http://www.youtube.com/user/WormsAndStuff
- Worm Factory 360 http://www.naturesfootprint.com/worm-factory-360
- A Vermicomposting Guide for Teachers: http://www.calrecycle.ca.gov/Publications/Detail.aspx?PublicationID=912
- Vermicomposting (New Mexico State University): http://aces.nmsu.edu/pubs/_h/H164/welcome.html
- Worm Composting Basics (Cornell University): http://compost.css.cornell.edu/worms/basics.html
- Small-Scale Vermicomposting (University of Hawaii): http://www.ctahr.hawaii.edu/oc/freepubs/pdf/HG-45.pdf
- How to Vermicompost at Home or Work: http://portal.ncdenr.org/c/document_library/get_file?uuid=f8d10625-0a33-45e6-9b3c-359dca90a037&groupId=38322
- Vermicomposting FAQs: http://www.mmsb.nf.ca/vermicomposting.asp?s=vermicompostingfaqs
- WormWoman.com: http://www.wormwoman.com/acatalog/vermicomposting.html
- Composting with Redworms: http://whatcom.wsu.edu/ag/compost/Redwormsedit.htm
- Wikipedia – Vermicompost: http://en.wikipedia.org/wiki/Vermicompost
Thursday, April 10, 2014
Sunflower Sprouts: Striped vs Black

I’ve been growing a lot of microgreens, but I thought I’d try a few sprouts. I have been focusing my attention on black oil sunflower seeds. They seem to be more popular and are more productive. This is to document a quick experiment between striped and black sunflower seeds since both are quite easy to get.
In the photo above, you can see the difference with the striped on the left and the black on the right. I started to soak the seeds at the same time. I started with four tablespoons of striped and three tablespoons of black. Both of the jars sat next to each other on the counter getting the same amount of light and water.
After a week, all of the black have sprouted while less than half of the striped did. In the same week, the striped only created about 1/4 cup of sprouts while the black a cup. The striped sprouts were small and sad while the black were strong and healthy. I also find the black taste better.
I gave the striped seeds away, and will continue to grow the black oil seeds.
Thursday, March 27, 2014
Citrus Flowers

The 3-N-1 Citrus tree I bought last year is blooming! The smell of the blossoms is intoxicating. I stood next to them today for ten minutes just enjoying the scent. The 3-N-1 is a mix of orange, lemon, and tangerine. The fruit will be full sized, but the tree is a dwarf growing inside in a pot.

The flowers are small; they are just larger than a quarter. It is great to see something blooming when we still have snow outside. I don’t think the tree is big enough to produce fruit yet, but I am happy to just enjoy the flowers.

Monday, March 24, 2014
Basic Fruit Tree Pruning Class

I recent attended a basic fruit tree pruning class hosted by Growing West Side. It was a quick introduction to pruning trees specifically fruit trees. It was taught by a local city forester. He spent some time explaining some of the reasons to prune: health, shape, and production. He also showed the tools he uses to care for the trees in the city.

After the classroom part, we took a short walk down the street, so he could demonstrate some of the techniques with the different tools. Here he is starting with a four year old plum tree. At that age, he felt the tree could be pruned as much as 30%. With the cold temps still in Minnesota, the time was right for pruning. He trimmed back some of the branches competing with the central leader. The central leader is a concept of a main branch that is the tallest and strongest.

A few minutes later, and you can see the tree is looking much better. Lots of the problems with branches competing with each other and rubbing on each other have been resolved. It also looks more open which should allow more sun to reach more parts of the tree. He did most of his pruning with a small pruning saw. He said he prefers that to sheers for most cuts over 3/4”. I will have to consider getting one. It made the job look very easy.

In this last photo, he is demonstrating his pole trimmer. It was a very nice tool. When my fruit trees get bigger, I will consider getting one. It extended from 8 to 16 feet. It was easy to use and had a rotating cutting head to get the angle of the cut just right.
I feel more confident about pruning my own trees now. Thanks Growing West Side.
Friday, March 21, 2014
More Microgreens

I’ve been having fun planting more microgreens. My wheatgrass is still going strong even after several harvests. I have started some new trays of wheatgrass too. I don’t know how long the existing ones will make it.
In the top photo, you can see some sunflowers just a few days old beginning to grow. The sunflowers in the middle are almost two wheels old. I think the cold temperatures in my house is slowing down their growth. I have been snacking on them even though they aren’t quite ready for harvest. They are very tasty. I can’t wait to eat the whole container.

This container has clover growing. It is also almost two weeks old and growing slowly as well.

You can see the wheatgrass in the background behind the chia seeds. I have been nibbling on them even though they aren’t ready to harvest. They still have their original two seedling leaves and haven’t grown the second set yet.

This last container is some sunflower seeds I planted today which have just barely started to sprout. I soaked them in water for a day and then waited for the little tails to poke out before planting to ensure the seeds were viable.
These indoor plantings are making the long winter more bearable. Have you started planting anything yet?
Subscribe to:
Posts (Atom)